K3PGP.Experimenter's.Corner
![]()
K3PGP.Experimenter's.Corner
![]()
Home Astronomy Construction Laser Moonbounce Software Guest Misc
By John, K3PGP 08/04/97 - Rev 1.05
After several mishaps trying to set up laser diode feedback regulators I decided there had to be a better way! The following circuit is a result of my experimentation. This regulator has been used for CW, MCW, FM, SSB, BPSK and video with no difficulty. Since going to this circuit I have not lost a single laser diode! It has been used with laser diodes from 5 mw to 500 mw.
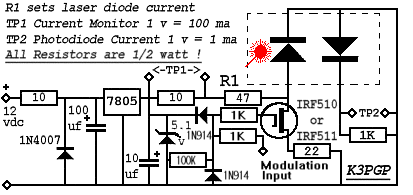 |
The circuit allows for 'soft' turn on of the laser diode via the 10 ohm resistor and 100 uf capacitor on the input of the 7805 regulator. A 1N4007 diode is provided to prevent reverse bias. The diode was connected in parallel instead of series to eliminate the voltage drop associated with a series diode. The 10 ohm resistor will limit the current and prevent any damage under reverse bias conditions. No fuse is necessary. |
Laser diode current is set via R1. Typical values are 39 to 47 ohms for 5 mw diodes and 22 ohms for 30 mw diodes. To be safe, start out with a LARGER resistor and work down. It is recommended that you bring the 12 vdc supply up SLOWLY from a variable bench supply when setting up the circuit while metering TP1 with a voltmeter and noting when the current reading levels off. (Use a battery operated voltmeter for this as neither test lead is at ground potential!) After you pass 8 volts or so you will notice that no matter how much voltage you feed into the circuit the current will NOT increase. The maximum safe voltage is approx. 35 vdc. At NO time should you allow the current to exceed Iop as specified by the manufacturer. If you reach Iop before the circuit limits, increase the value of R1!
NOTE: 1 volt equals 100 ma., meaning that if you are setting up your laser diode for 60 ma. the circuit should be set up so that you read 0.600 volts across TP1 when the circuit is into full limiting. Depending on the type of laser diode you are using TP2 may or may NOT provide a DC indication of laser output. Most ouput monitoring diodes require a DC bias. This function is not needed in this circuit and in fact some laser diodes do NOT have an internal power monitoring diode!
If you have the manufactures spec sheet and lm is specified you can measure this current across TP2. 1 volt equals 1 ma. Some manufacturers return the photodiode to + 5 vdc.
The 5.1 volt zener diode hanging across the output of the 7805 voltage regulator is a safety precaution in case the 7805 should fail. The 5.1 zener will clamp the voltage to safe level. The 10 ohm input resistor in series with the 12 volt line will limit the current. This is a also a precaution against any turn on transients.
The above circuit may appear to be a bit over designed. However, it seems to work just fine and since I am presently using this circuit with some laser diodes that cost as much as $300 a piece I feel safer with the extra protection provided by this circuit.
The shunt modulator was tried after blowing a couple of diodes with an experimental series modulator. It was found out too late that if the series regulator was overdriven it would blow the laser diode even if the 12 vdc line was turned off! I was using an NPN transistor for the series pass transistor and the overdrive went in the base and came out the emitter which was connected directly to the laser diode!
The MRF-510 or 511 IgFet (available from Radio Shack) provides very good linearity when used in this circuit. A 22 ohm resistor in series with the source lead is used to add a touch of negative feedback. When properly set up the current as monitored across TP1 will not change very much, if at all, when going from full power to complete beam cutoff. What is happening is the IgFet is SHUNTING the current to ground and preventing it from going into the laser diode. As the IgFet draws more current the laser diode gets less with the result that the load on the power supply remains fairly constant. The 22 ohm resistor may need slight adjustment for different laser diodes. It provides a bit of negative feedback and helps to make the modulator more linear. The circuit above was optimized for a 780 nm 5 mw laser diode.
The modulation input is DC coupled. This means you can apply a POSITIVE voltage and control the laser power. If your goal is linear operation such as AM, video, or SSB operation, you should bias this input for ½ laser power through a series resistor. Apply the AC waveform directly to the input through a capacitor.
The 1N914 and resistor diode network was added to the IgFet input circuit after one device developed a gate to drain short causing the drive to be applied directly to the laser diode.
NOTE: Most laser diodes typically have one lead of the laser diode and the photodiode tied to the case. On MOST IR diodes this is the NEGATIVE terminal. On MOST visible laser diodes the case is POSITIVE!
If the case is positive on your particular laser diode you will either have to insulate it from ground or better yet, hook it up as above and change the 7805 to a 7905 (negative 5 volt regulator) and reverse all the capacitors, diodes, etc… I always feel a LOT safer with the laser diode body at ground potential!
Several people building this circuit have used the LM317 ADJUSTABLE voltage regulator as a replacement for the fixed voltage 7805. Although this might make initial set up easier, all you need is a dirty pot or a resistor to fall off and you can accidentally over bias the diode. Use EXTREME caution if you elect to go this route!
At the very least I would suggest that you include the 10 ohm input resistor to the regulator and the 5.1 volt fail safe zener diode on the output of the regulator, the same as used on the 7805 above. This should prevent any accidents…
Driving multiple laser diodes !
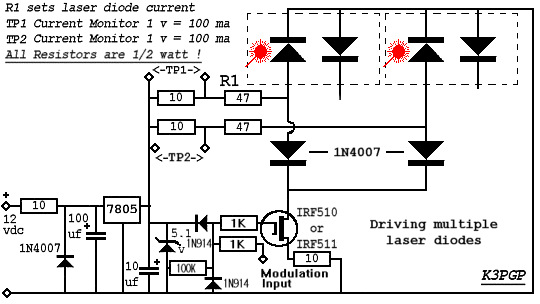 |
There are probably other ways to do this but this is
one way that works. The laser diodes can NOT simply be
hooked in parallel as the diode with the lowest forward
resistance will consume most of the current then blow.
When it blows the result will most likely be the
immediate destruction of the other laser diodes due to
the increased current assuming the first diode blows open
and does not become shorted. A similar problem exists
when hooking laser diodes in series. The only safe way is to provide each laser diode with it's own current limiting resistor as each diode may require slightly different bias. With this circuit should something happen to one of the laser diodes the others will be unaffected. |
As you parallel laser diodes you may need to reduce the value of resistor in the source lead of the IRF510. In fact you can simply eliminate it and tie the source lead to ground if you are using square wave modulation where linearity is of no concern. Note that seperate test points are provided to monitor the current to each laser diode. I've used this circuit with up to 16 laser diodes with no problem.
Contents of this website are ©1997-2014 of K3PGP and of the originating authors.